25 December 2013

Apple Cinnamon Rolls

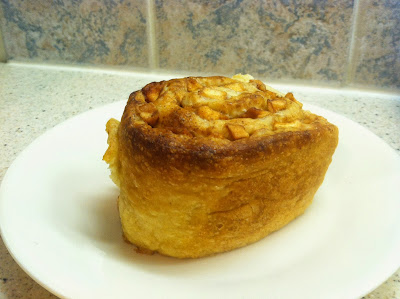
I've never liked cinnamon rolls. I've passed up countless rolls at breakfast and brunches throughout my life. To me, they were always too cloyingly sweet without much depth of flavor. For some reason, though, when my sister and I decided to organize a Christmas brunch for our family, I decided it was time to give cinnamon rolls another try. They needed two things: less sugar and more flavor. All that's needed  is a little orange blossom honey, which makes the rolls nicely sweet without being overwhelming (which my parents had on hand - clover honey would work well too though!). A good helping of cinnamon, a touch of nutmeg, and - what else? - apples, take these rolls above and beyond the ordinary. Even my brother-in-law, who has lofty standards with regard to cinnamon rolls, approved of these.

They're easy to make and can even be put together the night before, so you don't have to wake up at the crack of dawn to have delicious rolls ready for breakfast. Another great thing about these rolls is that all you need to do is swap out the butter for coconut oil and they will be vegan. Go ahead and make these for your next holiday (or post-holiday) brunch, and enjoy. Merry Christmas and Happy Holidays to all!


Dough adapted from these rolls on My New Roots

Ingredients
For Dough:
2 cups flour (whole wheat pastry flour or all-purpose)
1 Tbsp instant yeast
2 Tbsp coconut sugar
1 tsp sea salt
3/4 cup unsweetened applesauce
3 Tbsp butter or coconut oil
For Filling:
2 medium tart apples, peeled and finely diced (I used Arkansas Black)
1 scant Tbsp ground cinnamon
1/8 tsp nutmeg
2 Tbsp orange blossom honey, plus additional for glaze
1/2 cup chopped pecans (optional)

Directions
1. In a medium mixing bowl, whisk together dry ingredients for dough.
2. In a small saucepan, heat together butter/coconut oil and applesauce just until fat is melted (if it's too hot, it will kill the yeast!).
3. Stir the wet mixture into the dry ingredients until a sticky dough is formed. Turn out into a floured surface and knead until dough is elastic and just slightly sticky. NOTE: for me, the dough wasn't coming together in the bowl, so I turned it out and mixed it together on the counter. It came together well, and I even kneaded more flour into it.
4. Lightly coat a large bowl with oil. Place dough in the bowl and turn over once. Cover bowl and allow to rest in a warm place until doubled in bulk, 1-2 hours.
5. Meanwhile for filling, toss together diced apples, cinnamon, nutmeg, and honey. Set aside.
6. Turn dough out onto a floured surface. Roll out into a 6x18" rectangle. Spread filling evenly over top, then sprinkle with chopped pecans if desired. Make a tight roll, starting on the short end. Slice into seven rolls, then place rolls in a greased round 8" or 9" pan. Cover and let rest until risen, about 1 hour. NOTE: once you've put together the rolls, you can cover them in plastic and refrigerate overnight. Take them out in the morning and let them warm and rise in a warm place - such as in front of the wood burning stove at your parents' house!
7. Once risen, bake rolls in a preheated 325 degree F oven for 25-30 minutes, or until golden. Serve warm. If desired, drizzle some warm honey over rolls before serving (they're delicious with or without).

Makes 7 rolls
02 October 2013

Spaghetti Squash Casserole with Roasted Peppers and Chard


It's that time of year, when the days are getting shorter, the nights colder...and some of the best produce makes its appearance at the farmer's market. 'Tis the season of squash and apples (more on the latter later). Acorn, butternut, delicata, pumpkin...all delicious, but there's been one squash missing from my cucurbita repertoire. I've tried spaghetti squash once before, in its well-worn spaghetti alternative incarnation, but the mushy, watery nature of it turned me off. I decided last week, though, that the squash deserved a second chance. Roasted, drained of excess liquid, and mixed into a casserole with tasty chard and roasted peppers, perked up with a healthy dose of smoked paprika and tangy goat cheese, this squash wins on both flavor and texture. I don't know if I'll ever cook spaghetti squash as a replacement for my beloved pasta, but I'll make this casserole again!

www.urbanfarmonline.com

Ingredients
2 medium spaghetti squash (~6-7 cups roasted strands)
1 large sweet bell pepper
2 cups packed Swiss Chard (or spinach)
1 Tbsp olive oil
4 oz fresh goat chevre cheese
1 tsp smoked paprika (sweet paprika is fine too)
Panko bread crumbs (or gluten-free alternative)
freshly grated Parmesan or Pecorino cheese
Olive oil

Directions:
1. Roast spaghetti squash. I roasted mine like this; leave squash whole, prick holes into the skin all over with a small sharp knife. Place squash on a foil-lined baking sheet and roast in 375 degree F oven for 1 hr 20 min, turning squash halfway through. Set aside until cool enough to handle.
2. Scoop out seeds, then pull out flesh with a fork and transfer to a large colander. Allow to drain.
3. Roast pepper by placing over a flame or broiling in oven until blackened and blistered. Place in a small paper bag and secure opening, then set aside until cool enough to handle. Peel, seed, and dice.
4. Roughly chop chard, then briefly saute in a medium saucepan, just until wilted. Remove from heat.
5. In a large mixing bowl, combine squash, chard, peppers, paprika, and crumbled goat cheese. Transfer to a lightly greased 2 quart casserole dish. Top with bread crumbs and grate cheese generously over all.
6. Lightly drizzle olive oil across top of casserole, then bake in a 400 degree F oven until golden on top, about 25-35 min.

Serves 4-5 as a main course, 6-8 as a side dish

08 March 2013

The Best Banana-Coconut Muffins Ever

If I could make one quick bread ever, it would be banana bread...and I do make it a lot. Sometimes I'll even buy more bananas than I know I'll be able to eat (especially if they're on sale), just for a good excuse. As a result, I've done quite a bit of experimentation with the recipe over the years. I thought this was the pinnacle of banana bread...but that was until now. These muffins are flavorful, tender, and moist. The coconut adds a nice texture. They're indulgent without being sinful. Oh, yeah, and they're vegan. I'll call these the "So Good You Wouldn't Know They Were Vegan if I Didn't Just Tell You" Banana Muffins.

I use a mix of flours here, all whole grain, as inspired by the carrot muffin recipe in the Sprouted Kitchen cookbook. It's definitely worth it. You can swap out the whole wheat flour for your favorite gluten-free mix if you want, and you can always just use 2 cups of one flour - but I warn you, it won't be quite as good. Refer to here for making your own almond flour. If you hate coconut, don't let that deter you from making this recipe - just omit it. You'll love these; I know this is the recipe I'll be using from now on. So go out and buy that huge bunch of bananas, then forget about them for a week or so. You won't regret it.


Ingredients
1 cup whole wheat (or spelt) flour
1/2 cup oat bran
1/2 cup almond meal
2 Tbsp wheat germ
1 tsp baking soda
pinch salt
1/2 cup slivered or chopped almonds
1/2 cup unsweetened shredded coconut
2 Tbsp chia seeds + 6 Tbsp water
3 medium bananas, mashed
1/2 cup maple syrup
1/4 cup coconut oil, melted

Directions
1. Combine chia seeds with water in a small dish. Set aside for 15-20 min, or until a gel forms.
2. Combine dry ingredients (flour, oat bran, almond meal, baking soda, salt, almonds, coconut) in a medium mixing bowl.
3. Whisk together mashed bananas, honey, coconut oil, and chia seed gel. Add to dry ingredients, stirring just until combined.
4. Divide batter into 10-12 paper-lined muffin cups. Top with extra coconut, if desired.
5. Bake at 350 degrees F for 20-25 min, or until golden and a toothpick inserted in center comes out mostly clean.
6. Transfer muffins to a wire rack and allow to cool completely (if you have the patience).
7. Store in an airtight container for 4-5 days at room temperature, or freeze for 1-2 months.

Makes 10 larger or 12 smaller muffins

09 February 2013

Flourless Honey-Almond Cake with Cranberry Orange Frosting

First things first: my husband and I do not celebrate Valentine's Day. We're not really into the cheesy "romanticism" of the holiday, and the day doesn't hold any personal meaning for us - we have our own special days of the year. Personally, I think the holiday also puts a lot of negative pressure on those who don't have a significant other and wish they did. That said, I don't begrudge those who choose to celebrate Valentine's Day in good faith. After all, there's nothing inherently wrong with a day that celebrates love.

With that said, I did not make this cake with Valentine's Day in mind, but the tangy and just-sweet-enough cranberry frosting took on quite a distinct pink color that's fitting for the holiday. It may not be the most dramatic or elegant covering for a cake, but as with love, it's more about the substance than the appearance, and the flavor does not disappoint. It's a perfect cover for this cake that contains no flour - not that you'd notice. The almond flour creates a nice delicate crumb, and honey adds some natural sweetness, with fresh orange zest for some extra flavor. Cranberries and orange are the perfect combination of winter fruits, and they play a starring role here.

This cake is sweet, but not annoyingly so. Like real love, it's sweet enough and has real substance to it that allows you to indulge and leaves you with no regrets. It'll keep you coming back for more. ;)


Ingredients
3 eggs, separated
6 Tbsp clover honey
zest of one unwaxed orange
1/2 tsp baking soda
pinch salt
1 1/2 cup almond flour*
 4 oz cream cheese, softened
1/4 cup demerara sugar (or other natural sugar)
1/2 cup halved fresh or frozen cranberries, thawed
juice of one medium orange (about 1/4 cup)

Directions
1) In a medium mixing bowl, combine egg yolks, honey, baking soda, orange zest, and salt. Beat in almond flour until well combined.
2) Beat egg whites (allowed to warm to room temperature) until white and foamy, but not quite holding peaks. Gently fold into batter.
3) Pour batter into a parchment-lined 9x5" loaf pan. Bake at 350 degrees F for 25-30 min, or until golden brown and a toothpick inserted in center comes out clean.
4) Meanwhile, combine orange juice and a small handful of cranberries in a blender; blend until smooth. Add remainder of cranberries and pulse a couple of times until roughly chopped. Beat together cream cheese and sugar with an electric mixer, then stir in cranberry-orange mixture.
5) Allow cake to cool on a wire rack for 20 min or so, then frost. Cake is best eaten within a couple of hours, but can be stored in the fridge for a couple of days. Alternatively, cake can be made ahead, wrapped and stored at room temperature, and frosted when ready to serve.
Makes 4 large or 8 small servings

*Almond flour can be made by placing 1 1/4 cup blanched almonds in a food processor, and pulsing until ground finely (be careful to not go too far, or you'll make almond butter!). I sifted the ground almonds through a fine-meshed sieve to make sure I had a fine flour. If you make extra, make sure to store it in an airtight container in the freezer - the oils in the almonds can make it go rancid fairly quickly .